02 Lesson. Getting to know the sensors
Angular velocity sensor
The angular velocity sensor is designed to measure the angular velocity of a rotating object. It is necessary to measure the angular velocity in order to stop the rotation of the satellite and stabilize it. Also, using the angular velocity sensor, you can make the satellite rotate at a certain speed.
The principle of operation of the angular velocity sensor
The main measuring element of the angular velocity sensor is a special microelectromechanical (MEMS) gyroscope. This is not an ordinary gyroscope, in which a disk rotates at high speed, but a miniature vibrating gyroscope. There is a ring inside the MEMS gyroscope that oscillates in one plane. If such a gyroscope is placed on a rotating platform, the plane of which coincides with the plane of oscillation of the ring, then the Coriolis force proportional to the speed of rotation of the platform will begin to act on it. The Coriolis force is measured using piezoelectric elements that produce a voltage proportional to the applied force.
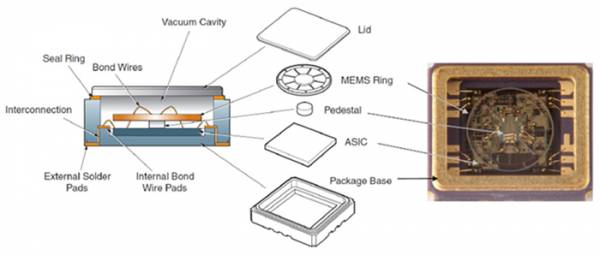
Picture 1. Angular velocity sensor device
By determining the Coriolis force and knowing the rate of oscillation, you can calculate the angular velocity and its change (angular acceleration).
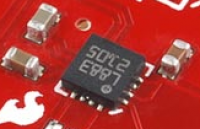
![Sensor chip]
Picture 2. Sensor element chip
Checking the operability of the angular velocity sensor
Connect the angular velocity sensor and PSS to the control unit. Open Notepad++ and write a program in Python or C.
Python code:
def control(): # The main function of the program, in which we call the rest of the functions

hyro_result = [0,0,0,0] # Initialize hyro_result
 num = 1 # Angular Velocity Sensor number
 print "Enable angular velocity sensor No.", num
hyro_turn_on(num) # Turn on AVS
sleep(1) # Waiting for 1 second
to turn on print "Get RAW data from angular velocity sensor"

for i in range(10): #Reading the readings 10 times
  hyro_result = hyro_request_raw(num) #writing the response of the function
# hyro_request_raw to the variable hyro_result
  if not hyro_result[0]: # if the sensor did not return an error message,
   print "state:", hyro_result[0], "x_raw =", hyro_result[1], \
    "y_raw =", hyro_result[2], "z_raw =", hyro_result[3]
    # Output the data
elif hyro_result[0] == 1: # if the sensor returned an error message 1
   print "Fail because of access error, check the connection"
elif hyro_result[0] == 2: # if the sensor returned an error message 2
   print "Fail because of interface error, check your code"

  sleep(1) # Readings are read once per second

print "Disable angular velocity sensor No.", num
hyro_turn_off(num) # Turn off AVS
``

#### The code in C:

```cpp hyro_test.c
#include "libschsat.h"

int control(){
uint16_t num = 1; // Angular velocity Sensor number
 int16_t hyro_result[] = {0, 0, 0, 0};
 printf("Enable (http://www.opengroup.org/onlinepubs/009695399/functions/printf.html) angular velocity sensor № %d", num);
 hyro_turn_on(num); // Enabling AVS
 Sleep (1); //Waiting for 1 second to turn on
 printf("\nGet (http://www.opengroup.org/onlinepubs/009695399/functions/printf.html) RAW data from angular velocity sensor\n");

 int i;
 for (i = 0; i < 10; i++) { //Reading the readings 10 times
 hyro_result[0] = hyro_request_raw(num,& hyro_result[1],& hyro_result[2],& hyro_result[3]);

 if (!hyro_result[0])
  {
   printf("state: (http://www.opengroup.org/onlinepubs/009695399/functions/printf.html) %d", i);
   printf(" (http://www.opengroup.org/onlinepubs/009695399/functions/printf.html) x_raw = %d", hyro_result[1]);
   printf(" (http://www.opengroup.org/onlinepubs/009695399/functions/printf.html) y_raw = %d", hyro_result[2]);
   printf(" z_raw = %d\n", hyro_result[3]);

  }
  else if (hyro_result[0] == 1)
  {
   printf("Fail (http://www.opengroup.org/onlinepubs/009695399/functions/printf.html) because of access error, check the connection");
  }
  else if (hyro_result[0] == 2)
  {
   printf("Fail (http://www.opengroup.org/onlinepubs/009695399/functions/printf.html) because of interface error, check your code");
  }
  Sleep(1);

 }
 printf("\nDisable (http://www.opengroup.org/onlinepubs/009695399/functions/printf.html) angular velocity sensor № %d\n", num);
 hyro_turn_off(num);
 return 0;
}
Run the program and test the AVS operation.
Code analysis
Please note that comments are written after the # symbol, which do not affect the operation of the program in any way.
The program starts with the declaration of the control() function.
Then we create a hyro_result list to receive data from the sensor and a num variable storing the sensor number.
Next, the print statement displays a message about turning on the sensor.
Then the hyro_turn_on(num) function turns on the sensor with the specified number.
The sleep function(1) Pauses the program execution for 1 second. Then in the for i in range(10) loop: we read and output the sensor value 10 times.
The sensor readings are read using the hyro_request_raw(num) function.
Magnetometer
Purpose of the magnetometer
The satellite receives orientation information from an angular velocity sensor and a magnetometer. Information about the angle is needed in order to turn the satellite in the right direction, and information about the angular velocity is necessary in order to stabilize the satellite, i.e. to extinguish angular rotation. The control moment is created using a flywheel motor.
The principle of operation of the magnetometer
The operation of the magnetometer is based on the application of the magnetoresistive effect, when the electrical resistance of the conductor changes in accordance with the direction of the magnetic field lines. The sensor is based on a permalloy layer (a special nickel-iron alloy), which has a strong magnetoresistive effect. The electrical resistance of permalloy usually varies in the range of ± 5% depending on the strength and direction of the acting magnetic field.

Picture 3. Magnetometer device
Thus, by measuring the strength of the current flowing through the permalloy layer when a constant voltage of + 5V is applied, the direction of the magnetic field lines can be determined. In order to measure the direction of the magnetic lines along all three axes, three small sensors are used, oriented along the X, Y and Z axes, installed in one chip.
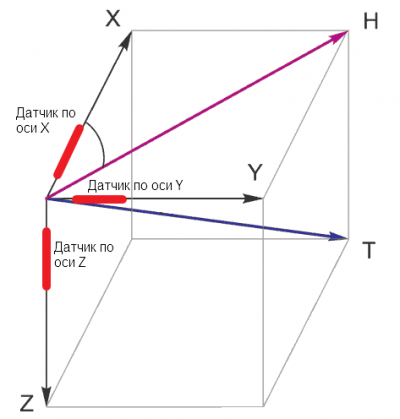
Picture 4. The direction of the magnetic field lines
Picture 5. Sensor
Checking the performance of the magnetometer
Open Notepad++ and write a program in Python or C.
Python code:
def control(): # The main function of the program, in which we call the other functions
mgn_result = [0,0,0,0] # Initialize mgn_result
 num = 1 # magnetometer number
 print "Enable magnetometer №", num
 magnetometer_turn_on(num)
 sleep(1)
 print "Get RAW data from magnetometer"
 for i in range(10):
mgn_result = magnetometer_request_raw(num)
if not mgn_result[0]: # if the sensor returned an error message,
   print "state:", mgn_result[0], "x_raw =", mgn_result[1], \
    "y_raw =", mgn_result[2], "z_raw =", mgn_result[3]
    # Pay attention to the line break character!
  elif mgn_result[0] == 1:
   print "Fail because of access error, check the connection"
  elif mgn_result[0] == 2:
   print "Fail because of interface error, check your code"
  sleep(1)
 print "Disable magnetometer №", num
 magnetometer_turn_off(num)
Code in C:
#define LSS_OK 0
#define LSS_ERROR 1
#define LSS_BREAK 2

#include <stdio.h>
#include <stdint.h>
#include "libschsat.h"
int control() // The main function of the program in which we call the other functions
{
 int16_t mgn_result[] = {0,0,0,0}; // Initialize mgn_result
uint16_t num = 1; // magnetometer number
 int i;
 printf("Rnable (http://www.opengroup.org/onlinepubs/009695399/functions/printf.html) magnetometer №%d\n", num);
 magnetometer_turn_on(num);
 Sleep(1);
 printf("Get (http://www.opengroup.org/onlinepubs/009695399/functions/printf.html) RAW data from magnetometer\n");
 for (i = 0; i < 1000; i++)
 {
  mgn_result[0] = magnetometer_request_raw(num,& mgn_result[1],& mgn_result[2],& mgn_result[3]);
  if (!mgn_result[0])// if the sensor returned an error message,
{
   printf("\nstate:%d, (http://www.opengroup.org/onlinepubs/009695399/functions/printf.html ) \nx_raw =%d,\ny_raw =%d, \nz_raw =%d\n",i, mgn_result[1], mgn_result[2], mgn_result[3]); //Pay attention to the line break character!
}
else if (mgn_result[0] == 1){
printf("Fail (http://www.opengroup.org/onlinepubs/009695399/functions/printf.html ) because of access error, check the connection");
  }
  else if (mgn_result[0] == 2){
   printf("Fail (http://www.opengroup.org/onlinepubs/009695399/functions/printf.html) because of interdace error, check your code");
  }
  Sleep(0.1);
 }
 printf("Disable (http://www.opengroup.org/onlinepubs/009695399/functions/printf.html) magnetometer №%d\n", num);
 magnetometer_turn_off(num);
 return 0;
}
Run the program and test the operation of the magnetometer.
Code analysis
The program starts with the declaration of the control() function.
Then we create a list of mgn_result to receive data from the sensor and a variable num that stores the magnetometer number.
Next, the print statement displays a message about turning on the sensor.
Then the magnetometer_turn_on(num) function turns on the magnetometer with the specified number.
The sleep function(1) Pauses the program execution for 1 second. Then, in the for i in range(10) loop: we read and output the magnetometer value 10 times.
The magnetometer readings are read using the magnetometer_request_raw(num) function.
Solar sensors
Purpose of solar sensors
The purpose of solar sensors is to determine the location of the satellite relative to the Sun. Since the position of the Sun relative to the Earth at any given time is known quite accurately, therefore, it is possible to determine the location of the satellite relative to the Earth.
The principle of operation of solar sensors
The solar sensor is based on a photodetector that measures the brightness of light. The most popular photodetectors are photoresistors and photodiodes.
A photoresistor consists of a material whose resistance varies depending on the intensity of the incident light.
Unlike a photoresistor, a photodiode outputs voltage under the action of light. Photodiode sensors come in several types — LEP (Lateral Effect Photodiode), QD photodiode (Quadrant Detector) or matrix.
Picture 6. Photodiode sensors
The LEP photodiode is a single photodiode with a large sensitive surface.
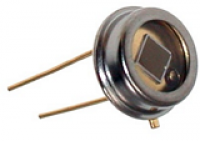
Picture 7. LEP photodiode
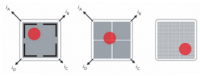
The QD photodiode consists of four independent photodiodes arranged symmetrically relative to the center of the sensitive surface.
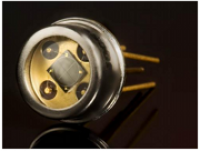
Picture 8. QD photodiode
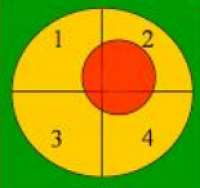
Picture 9. Calculation of the spot position on the surface of the QD photodiode
The calculation of the spot position on the surface of the QD photodiode is obtained from the ratios of the output currents of the photodiodes.
The matrix sensor contains a large number of photodiodes and allows you to determine the position of the Sun even more accurately.
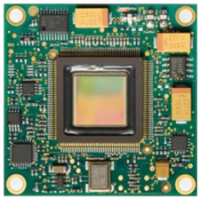
Picture 10. Matrix sensor
Checking the operability of solar sensors
Connect the solar sensors and PSS to the control unit in turn and check their operation. Open Notepad++ and write a program in Python or C.
Python code:
def control(): # The main function of the program in which you need to call the rest of the functions
sun_result = [0,0,0] # Initialize sun_result
 num = 1
 print "Enable sun sensor №", num
 sun_sensor_turn_on(num)
 sleep(1)
print "Get RAW data from sun sensor"

for i in range(10):
sun_result = sun_sensor_request_raw(num)
if not sun_result[0]: # if the sensor returned an error message,
   print "state:", sun_result[0], "raw =", sun_result[1], \
    sun_result[2]
  elif sun_result[0] == 1:
   print "Fail because of access error, check the connection"
  elif sun_result[0] == 2:
   print "Fail because of interface error, check your code"

  sleep(1)

 print "Disable sun sensor №", num
 sun_sensor_turn_off(num)
The code in C:
#include <stdio.h>
#include <stdint.h>
#include "libschsat.h"
#define LSS_OK 0
#define LSS_ERROR 1
#define LSS_BREAK 2

int control(){ //The main function of the program
 uint16_t sun_result[] = {0, 0, 0}; // initialize sun_result
uint16_t num = 1; // number of the solar sensor
 printf("Enable (http://www.opengroup.org/onlinepubs/009695399/functions/printf.html) sun sensor №%d\n", num);
 sun_sensor_turn_on(num); //turning on the sensor
 Sleep(1); //Waiting for 1 second
for printf("Get (http://www.opengroup.org/onlinepubs/009695399/functions/printf.html ) RAW data from sun sensor no.%d\n", num);
 int i;
 for (i = 0; i < 10; i++) //reading the display 10 times
{
sun_result[0] = sun_sensor_request_raw(num,& sun_result[1],& sun_result[2]);/*check how it works, it's very strange what works
if it doesn't set sun_result[0] */
  if(!sun_result[0]){ //if the sensor did not return an error message,
   printf("state: (http://www.opengroup.org/onlinepubs/009695399/functions/printf.html) %d raw = %d, %d\n", i, sun_result[1], sun_result[2]);
   }

else if (sun_result[0] == 1) { // if the sensor returned an error message 1
   printf("Fail because of access error, check the connection\n");
   }
  else if (sun_result[0] == 2) { // if the sensor returned an error message 2
   printf("Fail (http://www.opengroup.org/onlinepubs/009695399/functions/printf.html) because of interface error, check you code\n");
   }
  Sleep(1); //readings are read once per second

}
printf("Disable (http://www.opengroup.org/onlinepubs/009695399/functions/printf.html ) sun sensor no.%d\n", num);
 sun_sensor_turn_off(num); //turning off the solar sensor
return 0;
}
``

Run the program and test the operation of the solar sensor.
Test all 4 solar sensors one at a time.

### Code analysis
The program starts with the declaration of the control() function.

Then we create a sun_result list to receive data from the sensor and a num variable storing the sensor number.

Next, the print statement displays a message about turning on the sensor.

Then the sun_sensor_turn_on(num) function turns on the sensor with the specified number.

The sleep function(1) Pauses the program execution for 1 second.

Then in the for i in range(10) loop: we read and output the sensor value 10 times.

The sensor readings are read using the sun_sensor_request_raw(num) function.