01 Lesson. Getting to know the OrbiCraft constructor
Writing and running the HelloWorld program
In this section, we will learn how to install the software necessary to write programs for the designer, write the simplest program and run it.
This algorithm of actions will be relevant in the future when performing more complex tasks on the OrbiCraft constructor.
Step 1. Installing the software
- Go to the [Required Software] section(/docs/orbicraft/instruction_for_working_with_orbicraft/required_software). In the Development Environment section, download the latest version of NotePad++;
- Unpack the contents of the downloaded archive to the **C:** section (root of the C disk)
You can also install NotePad++ in any other folder. It is important that the folder location path is written in Latin, without using special characters (!#@, etc.), does not contain spaces and does not start with a digit.
- Go to the folder that appears C:\Notepad++, run the file notepad++.exe**;
- Create the Orbicraft_Test_Program folder in the root of the C drive.
You can create a folder in another location. In fact, it is even more correct to keep the programs in the appropriate folders on your computer. It is important that, as in our example, the path of the folder and its name are written in Latin, without using special characters (!#@, etc.), do not contain spaces and do not start with a number.
Do not place the folder to save the file in the folder of the NotePad++ itself!
The programming environment NotePad++ is designed for the user to write on-board software and prepare its download on board. The environment is deployed and launched on a regular personal "ground" computer with Windows OS.
Stage 2. Writing the program
In the main window NotePad++ You can write your own programs. As the first test, we will write a traditional program for displaying a welcome message "Hello, world!". You can copy it from the field below.
HelloWorld.c
#include <stdio.h>

void control(void){
 puts("hello, world!");
}
The first line connects the library necessary to work with the constructor. The program is written in the C language.
- Save the file to a previously created folder Orbicraft_Test_Program. File –> Save as –> select the folder location (C:\ - Orbicraft_Test_Program) –> enter the file name (HelloWorld) –> select the file type (C source file(*.c)) –> click Save**.
In the future, it is important that, as in our example, the file name is written in Latin, without using special characters (!#@, etc.), does not contain spaces and does not start with a digit.
You will see that the syntax of the program has started to be highlighted in different colors, as in the picture below:

- Collect the archive necessary to download the program to the on-board computer of the designer. To do this, click on the icon
 located on the right in the menu bar.
After the assembly is completed, a window should appear at the bottom with a report on the successful assembly of the archive, as shown below:

If the build report ends with the words about the error (Zip Error), then try to check the correctness of the above actions. Pay attention to the location and names of the files, which must be in Latin and must not contain special characters (!#@, etc.), spaces or start with a number.
An archive with the name identical to the program name should appear in the Orbicraft_Test_Program folder. In the future, we will upload it to the on-board computer of the designer.
Stage 3. Assembling and launching the hardware
- Take 2 devices from the OrbiCraft designer kit - On-board control computer (BCU) and The Power Supply System Unit (PSS).
- Connect the devices with a cable loop. Devices can be connected through any connectors.
You can read about how to assemble the cable network cable correctly in the corresponding section.
- Press the red PSS power button. The voltmeter display should light up. The voltmeter readings should be at least 7.4 V. In case of readings below, charge the PSS using the charger included with the designer, in this case the green indicator will light up.
- Wait 1-2 minutes, then check the Wi-Fi network environment. The designer's network should appear there as an access point. By default, the network name is SCHSAT. Connect to the network. Wait 30 seconds.
The selected Wi-Fi network will be marked "Connection is limited" or "No Internet access". This is normal, since the Wi-Fi network that the OrbiCraft constructor creates is really not designed to access the Internet, but is needed to control the constructor.
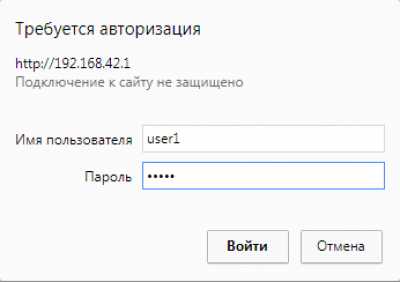
- Log in to the browser. Enter the address in the address bar 192.168.42.1 . A user and password entry window will appear. In both fields, enter user1, click Log in.
Here is the Web interface of the OrbiCraft constructor. With it, you can download programs to the on-board computer, access the Wiki, and make basic settings, such as changing the name of the Wi-Fi network, which you may need in the future.
Stage 4. Launching the program
For convenience, the instructions for working with the Web interface are duplicated in the Web interface itself. Several programs can be downloaded to the BKU at the same time.
To download and run the program, you need to perform the following steps:
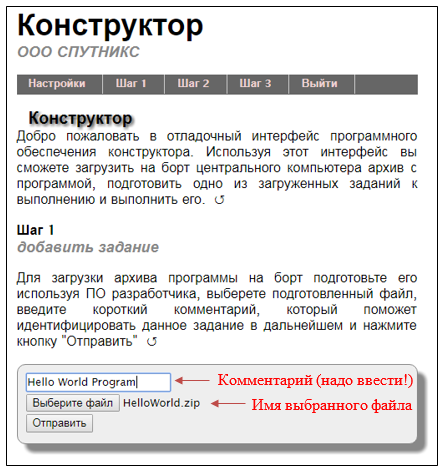
Step 1. Download the archive
Upload the zip archive generated in NotePad++. (C:\ - Orbicraft_Test_Program – HelloWorld.zip) to the download area. In the comment field, be sure to write the name of your program. Press the button Send.
It takes time to send the program. Wait a couple of seconds. You will be automatically redirected to step 2.
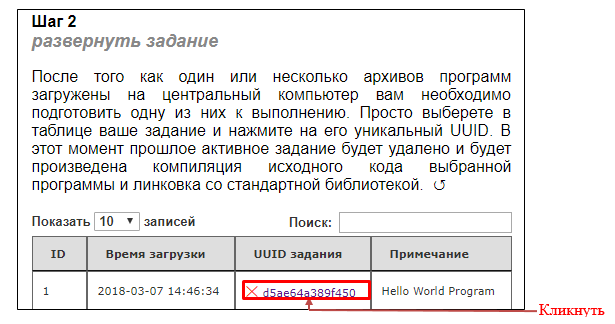
Step 2. Select the downloaded task from the list
Click on the link in the "Task UUID" field to activate the required program. After this click, the program will be compiled. It may take some time.
Wait a few seconds: the page will refresh first and show Step 1, and then automatically go to Step 3.
Step 3. Start the program execution
In step 3, a link is displayed, click on it. A new browser window will open in which you will need to run the program.
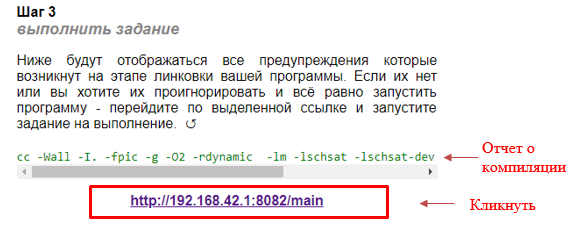
A short report on the compilation results is displayed in the line above the link. In particular, there may be error warnings that will be marked in red.
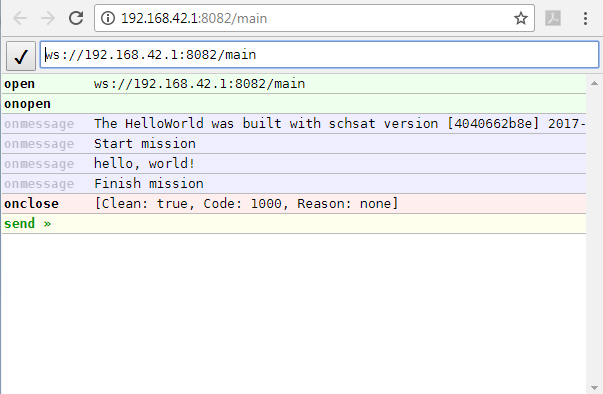
Step 4. Run the program
To start the program, click the button![]() in the browser page that opens. The program will be completed (in our case, the greeting "hello, world!" will appear) and will end. Clicking on the same button again will restart the program, you can run it in one page an unlimited number of times.
in the browser page that opens. The program will be completed (in our case, the greeting "hello, world!" will appear) and will end. Clicking on the same button again will restart the program, you can run it in one page an unlimited number of times.
Step 5. Completing the program To complete the program, you can simply close the browser page, go back to Step 2 to select another program that has already been downloaded, or to Step 1 to download a new one.
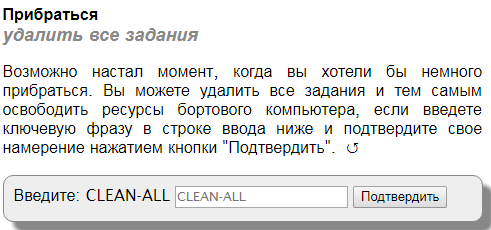
You can remove an unnecessary program from the list by simply clicking on the red cross in the "Task UUID" field next to the program selection link.

Also, at the very end of the Web interface page, it is possible to delete all downloaded programs at once by entering the CLEAN-ALL command in the line of the Clean Up item.