File transfer over HF
HF file transfer scheme
The command to transfer photos over the HF communication channel is sent to the Houston App and through the Houston Server and the ground-based VHF transceiver is transmitted to the designer via the AX.25 protocol. The on-board VHF transceiver sends a command over the CAN bus to the on-board Houston Server running on Raspberry Pi. When a ground IR receiver (Ground IR tranceiver) is connected to a computer and the virtual COM port of the transceiver is connected to the IR Reciever program, the received command runs a script that transmits photos between IR transceivers at a speed of 9600 baud. The image received by the ground-based IR receiver using IR Reciever is saved in its folder with the file name consisting of the current date and time (Picture 1):
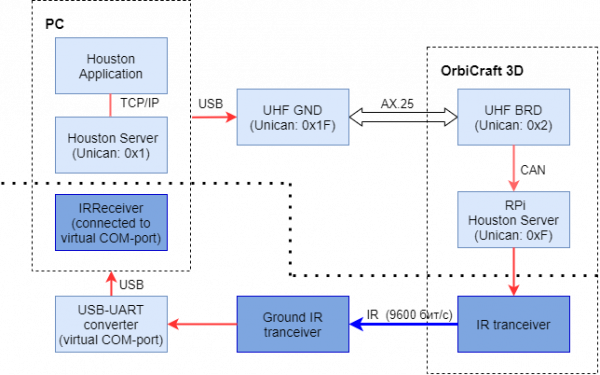
Picture 1. HF file transfer scheme
Installing IR Reciever
- Assemble the ground HF transceiver according to the instructions.
Install the ground HF transceiver driver from the [Required Software] page(/docs/orbix/development_environment/required_software).
Connect the ground HF transceiver to your computer via USB, open Windows Device Manager and make sure that the new device appears in the section COM and LPT ports (Picture 2):
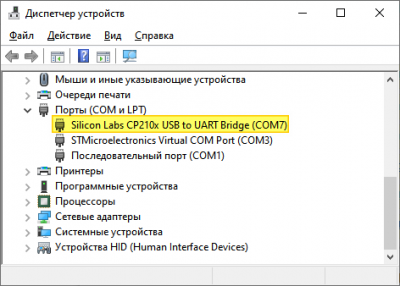
Picture 2. Viewing the device in the Device Manager
The IR Reciever program required to work with a terrestrial HF transceiver can be downloaded from the [Required Software] page(/docs/orbix/development_environment/required_software).
The ground HF transceiver is not a radio transmitter, as on a real spacecraft, it transmits data over an IR channel at a speed of 9600 bits per second._
The order of file transfer using an HF transceiver
Connect a terrestrial VHF transceiver to the computer;
Launch Houston Server and Houston App;
Turn on the OrbiX constructor;
Connect the ground HF transceiver to the computer via USB;
Open the Windows Device Manager and make sure that the new device has appeared in the COM and LPT ports section;
Launch the IR Receiver – select the COM port of the ground HF and press the Connect button (Picture 3):
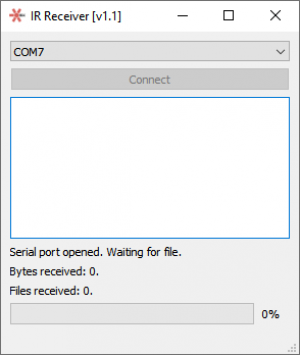
Picture 3. Connecting to IR reciever
Create a photo using the OrbiX camera or select an existing photo.
To transfer an uncompressed photo, open the Houston App and issue the command 0x1 execute_script to the address F (RPi) with the following parameters: id 13 arg Nphoto. For example, to transfer a full-size photo 3.jpg You need to set the parameters 13 and the photo number 3 . You need to wait for the download to finish, the downloaded photo will be in the IR Receiver program folder (Picture 4):
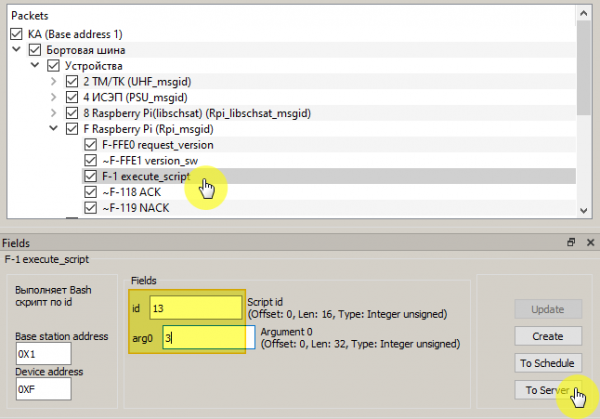
Picture 4. Transfer photos from OrbiX
To increase the speed of downloading photos, you can pre-compress images to the desired quality with the command 0x1 execute_script to the address F (RPi) with the following parameters:
- id 15 arg Nphoto – minimum quality photo;
- id 16 arg Nphoto – medium quality photo;
- id 17 arg Nphoto – maximum quality photo.
After successful completion of compression, a response ~ACK will be received.
The compressed file is downloaded using the command0x1 execute_script to the address F (RPi) with the id parameter equal to 14 .
To transfer the compressed photo, open the Houston App and issue the command 0x1 execute_script to the address F (RPi) with the following parameters: id 14 arg Nphoto. For example, to send a preview of a photo 2.jpg You need to set the parameters 14 and the photo number 2 . You need to wait for the download to finish, the downloaded photo will be in the program folder IR Receiver (Picture 5):
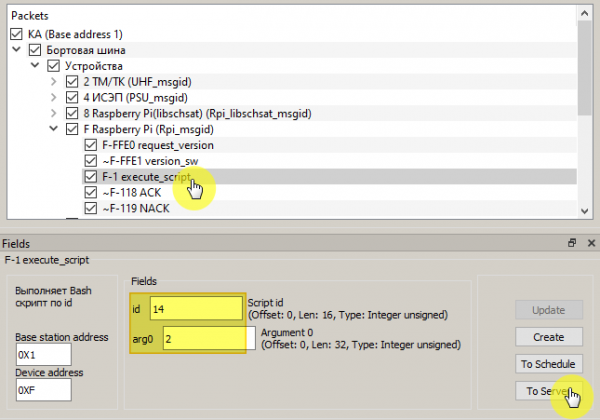
Picture 5. Transfer photos via HF
At the beginning of the download, IR Reciever will look like this (Picture 6):
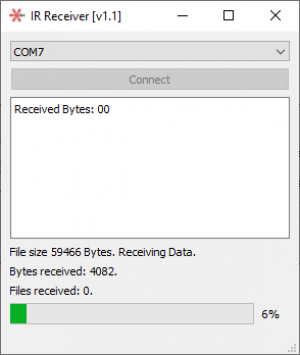
Picture 6. Start uploading when transferring photos
Upon successful download, the message CRC Correct. Successful receive. will appear, and an image file (Picture 7) will appear in the program folder IR Reciever:
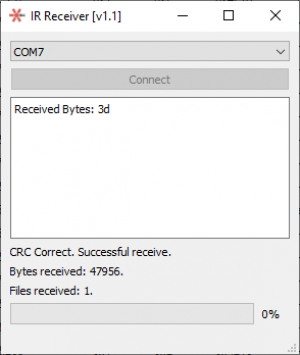
Picture 7. Successful photo transfer
If the transfer is unsuccessful, the IR Reciever window will look like this, and the file will not appear in the program folder IR Reciever (Picture 8)
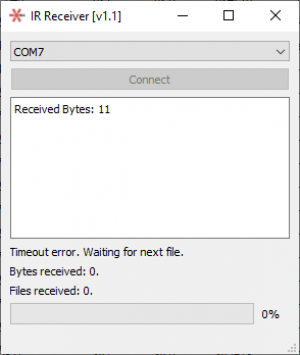
Picture 8. Example of an unsuccessful transfer termination