Transfer photos from Raspberry Pi over VHF
File transfer scheme over VHF via Houston Telnet Client
Houston Telnet Client connects to Houston Server (address 0x1) via the TCP/IP protocol, from where commands are transmitted via terrestrial VHF over the radio channel to the on-board VHF via the AX.25 protocol. Commands are sent from the on-board VHF via the CAN bus to Raspberry Pi, where the on-board Houston Server converts them from CAN to TCP/IP. Then the commands go through the socat utility, which transmits a stream of characters from TCP/IP to the bash terminal. As a result of executing commands, files from Raspberry Pi are transferred via VHF and saved in the appropriate folder Houston Telnet Client (Picture 1):

Picture 1. VHF file Transfer scheme
Houston Telnet Client
Install the program Houston Telnet Client from the Required Software page
Run the Houston Server program, which is used by the Houston Telnet Client to communicate with the terrestrial VHF transceiver.
Connect the terrestrial VHF transceiver to your computer via USB, open Windows Device Manager and make sure that the new device appears in the section COM and LPT ports (Picture 2):

Picture 2. Selecting a device in the Device Manager
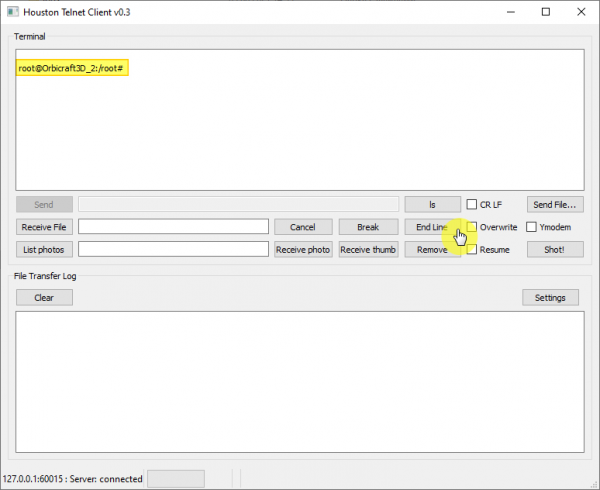
Run the program Houston Telnet Client, the status of the TCP/IP connection will be displayed in the status bar (Picture 3):
![Status TCP/IP-соединения]
Picture 3. TCP/IP connection status
Description of the buttons:
ls - displays information about files and directories.
The CR LF checkbox sets the end of line character (0x0A if unchecked, and 0x0D 0x0A if checked).
Receive File - starts file transfer from the onboard folder to the ground folder. The name of the file from the current directory is indicated in the text field on the right.
The Ymodem checkbox switches to the Ymodem protocol (the Zmodem protocol is used by default)
dangerAttention! Only Ymodem is used to download or download files from the onboard VHF. To download photos from Raspberry Pi, it is better to use Zmodem, since it allows you to resume interrupted data transfer (to do this, select the Resume checkbox and click on the file download button).
The Overwrite checkbox instructs the recipient to overwrite a local file with the same name.
The Resume checkbox allows you to switch to resume mode if the previous file transfer was interrupted.
Send File - starts file transfer from the ground folder to the on-board folder.
Cancel - sends the completion symbol to the sender and cancels the local receiving procedure.
Break - sends the termination character to the sender (used when the sender is not available after the file transfer).
End line - resets the shell input buffer and receives the shell prompt.
List Photos (command ls -l) - shows a list of photo files in the photo directory.
Receive Photo - starts the transfer of a photo with the number indicated in the text field on the left from the on-board folder to the ground folder.
Receive Thumb - starts the transfer of a preview photo with the number indicated in the text field on the left, from the onboard folder to the ground folder.
Remove - removes the photo and its thumbnail, with the specified number, from the on-board catalog of photos / thumbnails.
Clear - clears the text area of the magazine.
Shot! - take a photo (creates a photo file and a preview file).
Settings - opens the settings window.
The Settings window allows you to configure the following parameters (Picture 4):
- Telnet port – connection port Houston Server, IP:port (60015 – to work with Raspberry Pi, 60002 – to work with on-board VHF).
- Zmodem – window size, reception timeout, transmission block size.
- Remote paths – remote (on-board) photo directories, photo file extensions, a script for creating a photo.
Default script shot.sh 2 parameters are required: camera number and output file format. For example, for a photo from the on-board camera Raspberry Pi, the following value of the parameter Shot script is used:
/home/pi/scripts/shot.sh 0 jpg
Local Paths – local (terrestrial) photo directories and directories for other file downloads.
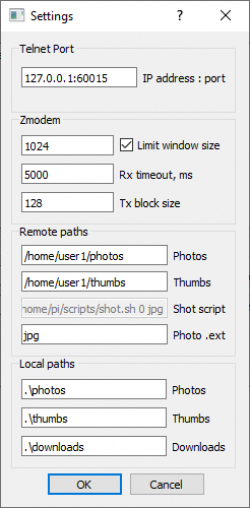
Picture 4. Houston Telnet Client Settings Window
Uploading photos via VHF
Before downloading, you need to make sure that the names of the downloaded files do not match the names of previously downloaded files that are in the Houston Telnet Client folder, because if the names match, an error will be displayed and the download will be completed. You either need to delete the file from the Houston Telnet Client folder or click the Overwrite checkbox to write a new file on top of an existing one The sequence of actions for uploading photos from the onboard Raspberry Pi to a computer via VHF.
- Make sure that the status bar of the main window displays the status Server: connected. If not, check the Telnet port parameter in the Settings Settings and connect to Houston Server (Picture 5):
![Connection status]
Picture 5. Connection status
- Press the "End line" button. The shell prompt should appear in the terminal text field (Picture 6):
Picture 6. Terminal text field with an invitation
- Click the List Photos button. The list of photo files should appear in the terminal text field. Assume that the file names match the following pattern: #.jpg (Picture 7):
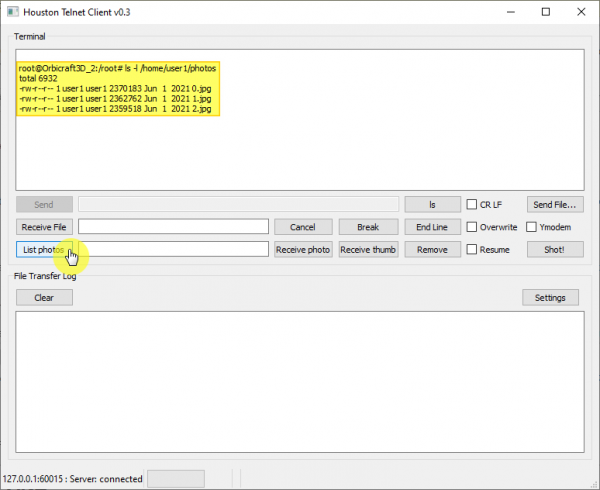
Picture 7. List of photos
- Enter the photo number in the text field to the right of the List Photos button. Then press the Receive Thumbs button to upload thumbnails or Receive Photo to upload photos. At the beginning of the download, the Houston Telnet Client window looks like this (Picture 8):
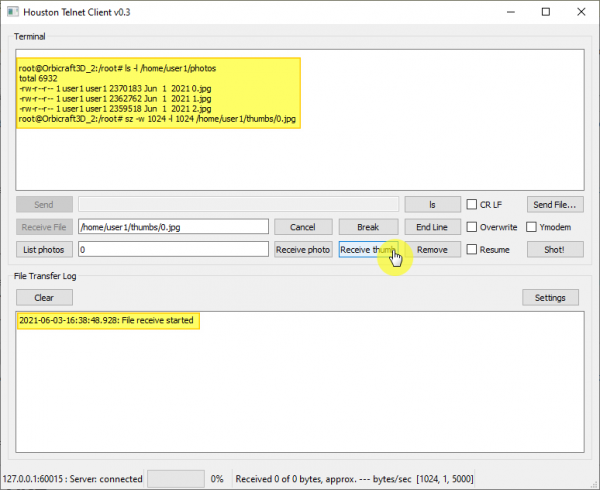
Picture 8. Start uploading thumbnails of photos
- Wait for the file transfer to complete. The approximate download speed and progress bar are displayed in the status bar. At the end of the transfer, the Houston Telnet Client window looks like this (a message appears in the log ("File receive ends")) (Picture 9):
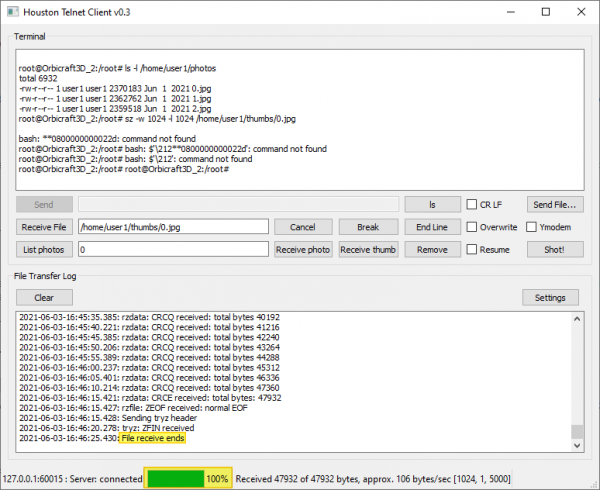
Picture 9. The end of the transfer of thumbnails
- Press the "End line" button. The shell prompt should appear in the terminal text field (Picture 10):

Picture 10. Shell prompt in the terminal text field
The downloaded files will be stored in the appropriate folders of the Houston Telnet Client application, photos in the photos folder, and thumbnails in the thumbs folder.