Serial Interface monitor
Not all information can be displayed using LEDs, sometimes you need to output some text or, conversely, read text commands. I.e. interact with the program during its execution. And the serial interface monitor, or as it is also called the port monitor, will help us in this. This is a special area where you can interact with the program: output any information there (button status, sensor readings, text) or read the entered commands from it. The serial connection in English will be Serial.
Therefore, all functions related to the serial interface monitor begin with the word Serial:
Serial.begin(9600) - the command to start working with the serial interface monitor. 9600 is the data transfer rate to the serial interface monitor. This command is written in the procedure void setup();
Serial.println() - line wrap data output. As if the Enter key is pressed after the data is output;
Serial.available() - check whether commands are entered in the command input window in the serial interface monitor;
Serial.read() - reads commands entered into the serial interface monitor.
To display the serial interface monitor, click on the corresponding button in the lower right corner, and it will open.

Picture 1. Serial Interface monitor
Reading the status of the button
Assembling the circuit
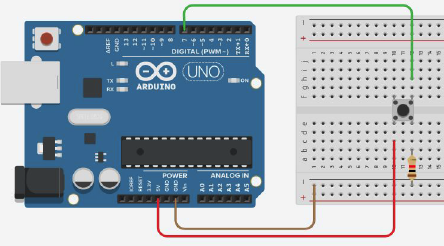
Picture 2. The scheme for reading the status of the button
We output the button status data to the serial interface monitor. The button is connected according to the PULL DOWN scheme.
- 1 will be displayed - if the button is pressed;
- 0 will be displayed if the button is released.
Program for displaying the button status to the serial interface monitor
``cpp //creating a variable for the button #define button 7
void setup(){ //setting up the pin to which the button is connected as an input pinMode(button, INPUT); //setting up work with the port monitor Serial.begin(9600); }
void loop(){ Serial.println(digitalRead(button)); //output the status of the button to the port monitor delay(500); //waiting for half a second } ``
Program for displaying the button status and additional information
``cpp //creating a variable for the button #define button 7
void setup(){ //setting up the pin to which the button is connected as an input pinMode(button, INPUT); //setting up work with the port monitor Serial.begin(9600); }
void loop(){ Serial.print("Button state: "); //output the phrase "Button state: " to the port monitor Serial.println(digitalRead(button)); //displaying the status of the button delay(500); //waiting for half a second } ``
Reading data from the serial interface monitor and controlling the LED
Assembling the circuit
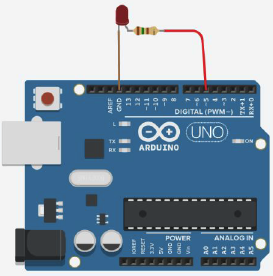
Picture 3. Circuit for reading data from a serial interface monitor and LED control
We are reading data from the port monitor. To save them, we use the data variable of the character type char. Since the entered commands are not saved automatically in the port monitor, we will output them ourselves using the command Serial.print().
- If data == 1 , then turn on the LED;
- If data == 0 , then turn it off.
Data reading and LED control program
``cpp int led = 5; //creating a variable for the LED char data = 0; //creating a variable to store commands entered into the serial interface monitor
void setup(){ Serial.begin(9600); //setting up work with the port monitor pinMode(led, OUTPUT); //setting the pin with LED as output }
void loop(){ if (Serial.available() > 0){ //checking if commands have been received in the port monitor data = Serial.read(); //read the received commands Serial.print(data); //output the received command if (data == 'R') to the port monitor{ //if the variable data == 'R' - turn on the LED, digitalWrite(led, HIGH); } else if (data == 'r'){ //and if 'r' - turn off the LED digitalWrite(led, LOW); } } }
:::tip
More information about **Serial.begin()** can be read [here](http://arduino.ru/Serial/Begin "Serial.begin()").

More information about **Serial.print()** can be read [here](http://arduino.ru/Reference/Serial/Print "Serial.print()").

More information about **Serial.read()** can be read [here](http://arduino.ru/Reference/Serial/Read "Serial.read()").
:::

## Tasks

1. Assemble a circuit with an Arduino and two buttons connected to pins 5 and 6 using 10kOhm resistors. Program the Arduino so that when the first button is pressed, the phrase "Button 1" is displayed in the port monitor, and when the second button is pressed, "Button 2".

2. Assemble a circuit with an Arduino and two LEDs connected to pins 8 and 12 using 390 ohm resistors. Program the Arduino so that when reading the value "1" from the port monitor, the first LED turns on, and when reading the value "2" it turns off. And, similarly, when reading the value "3" from the port, the second LED should turn on, and when reading the value "4" it should turn off.