DHT11 temperature and humidity sensor
Device and principle of operation
Inside the housing, on the sensor side, there is a humidity sensor and an NTC temperature sensor (thermistor). On the other hand, there is a small printed circuit board with an 8-bit chip in the SOIC-14 case. This chip measures and processes an analog signal with stored calibration coefficients, performs analog-to-digital conversion and outputs a digital signal with temperature and humidity data.
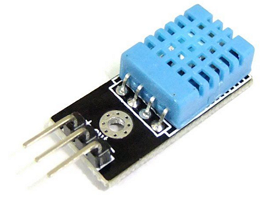
Picture 1. DHT11 Temperature and Humidity sensor
The moisture-sensitive component, which is used, of course, to measure humidity, has two electrodes with a moisture-retaining substrate (usually salt or a conductive plastic polymer) sandwiched between them. As the water vapor is absorbed, the substrate releases ions, which in turn increases the conductivity between the electrodes. The change in resistance between the two electrodes is proportional to the relative humidity. Higher relative humidity reduces the resistance between the electrodes, while lower relative humidity increases this resistance.
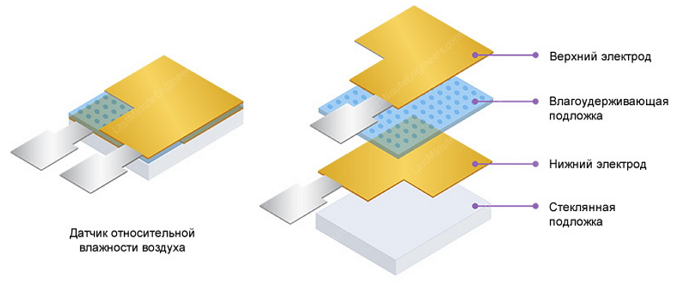
Picture 2. Relative humidity sensor device
In addition, these sensors have an NTC temperature sensor (thermistor) for measuring temperature. A thermistor is a thermistor – a resistor that changes its resistance depending on temperature. Technically, all resistors are thermistors – their resistance varies slightly depending on temperature, but usually this change is very small and difficult to measure.
Thermistors are made so that their resistance changes dramatically when the temperature changes, and a change of one degree can be 100 ohms or more! The term "NTC" means "Negative Temperature Coefficient", which means that resistance decreases with increasing temperature.
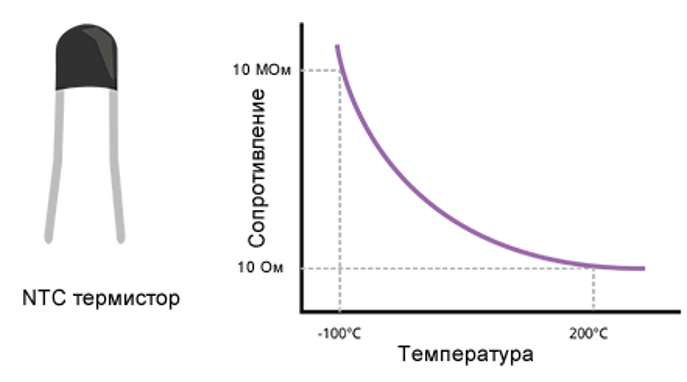
Picture 3. Thermistor
Device and principle of operation
Connecting the DHT11 sensor
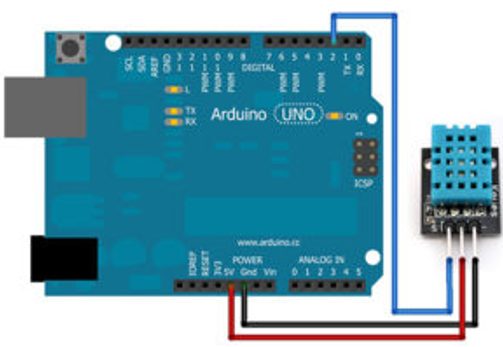
Picture 4. Connecting the DHT11 sensor
Working with the dht11-master library
Let's write a program to read temperature and humidity readings from the sensor. We declare the sensor, indicate where the out is connected. We read the information from the sensor and output it to the port monitor. Of course, we will add additional information - words - what we output to the port monitor and indicate the units of temperature and humidity.
#include <dht11.h> //connecting the library
#define dht11pin 2 //creating a variable for the sensor pin
dht11 DHT; //announcing the temperature and humidity sensor

void setup(){
  pinMode(dht11pin, INPUT); //configuring the sensor pin as input
  Serial.begin(9600); //setting up work with the port monitor
}

void loop(){
DHT.read(dht11pin); //reading the sensor readings
  //output temperature readings to the port monitor
  Serial.print("Temperature = ");
  Serial.print(DHT.temperature);
  Serial.print(" C");
  //output humidity readings to the port monitor
  Serial.print(", Humidity = ");
  Serial.print(DHT.humidity);
  Serial.println(" %");
  delay(1000); //waiting for 1 second
}
``

### Working with the SimpleDHT library

```cpp
#include <SimpleDHT.h> //connecting the library
SimpleDHT11 dht11(2); //announcing the temperature and humidity sensor

void setup() {
Serial.begin(9600); //configuring work with the port monitor
}

void loop() {
byte temperature = 0; //creating byte type variables to store sensor readings
  byte humidity = 0;
dht11.read(&temperature, &humidity, NULL); //reading the sensor readings
  Serial.print("Temperature = "); //output temperature readings to the port monitor
  Serial.print(temperature);
  Serial.print(" C, ");
  Serial.print("Humidity = "); //output humidity readings to the port monitor
  Serial.print(humidity);
  Serial.println(" %");
  delay(1000); //waiting for 1 second
}
``

### Working with the DHT sensor library

```cpp
#include "DHT.h" //connecting the library
#define DHTpin 2 //variable for sensor pin
#define DHTtype DHT11 //variable for sensor type
DHT dht(DHTpin, DHTtype); //initializing the sensor

void setup() {
Serial.begin(9600); //setting up work with the port monitor
  dht.begin(); //starting the sensor
}

void loop() {
float hum = dht.readHumidity(); //reading humidity readings
  float temp = dht.readTemperature(); //reading temperature readings in degrees Celsius
  float tempF = dht.readTemperature(true); //reading temperature readings in degrees Fahrenheit
  Serial.print("Temperature:"); //output all three types of sensor readings to the port monitor
  Serial.print(temp);
  Serial.print(" C, ");
  Serial.print(tempF);
  Serial.print(" F; ");
  Serial.print("Humidity: ");
  Serial.print(hum);
  Serial.println(" %;");
  delay(1000); //waiting for 1 second
}
``

### Working with the DHT sensor library

```cpp
#include "DHT.h" //connecting the library
#define DHTpin 2 //variable for sensor pin
#define DHTtype DHT11 //variable for sensor type
DHT dht(DHTpin, DHTtype); //initialize the sensor
//create variables for each of the pins of the RGB LED
int redLed = 11;
int greenLed = 10;
int blueLed = 9;
//creating variables for the brightness value of each of the RGB colors
of the int red LED;
int green;
int blue;

void setup() {
Serial.begin(9600); //setting up work with the port monitor
  dht.begin(); //starting the sensor operation
  pinMode(redLed, OUTPUT); //setting the RGB LED pins as
pinMode outputs(greenLED, OUTPUT);
  pinMode(blueLed, OUTPUT);
}

void loop() {
//reading humidity readings
  float hum = dht.readHumidity();
  //we read the temperature readings in degrees Celsius
  float temp = dht.readTemperature();
  //reading temperature readings in degrees Fahrenheit
  float tempF = dht.readTemperature(true);
  //we output all three types of sensor readings to the port monitor
  Serial.print("Temperature: ");
  Serial.print(temp);
  Serial.print(" C, ");
  Serial.print(tempF);
  Serial.print(" F; ");
  Serial.print("Humidity: ");
  Serial.print(hum);
  Serial.println(" %;");
  delay(1000);
  //if the temperature is less than 25 degrees
  //the RGB color of the LED is green
  if(temp<25){
    setRGB(0, 255, 0);
  }
//if the temperature is from 25 to 30 degrees
  //the RGB color of the LED is yellow
  else if(temp>=25 && temp<30){
    setRGB(255, 255, 0);
  }
//otherwise, the RGB color of the LED is red
  else{
    setRGB(255, 0, 0);
  }
}

//A subroutine that sets the glow color of an RGB LED
//This function has 3 parameters
//r - red glow brightness
//g - green glow brightness
//b - blue glow brightness

void setRGB(int r,int g,int b){
  analogWrite(redLed,r);
  analogWrite(greenLed,g);
  analogWrite(blueLed,b);
}
Tasks
Assemble the circuit with the DHT11 sensor and the servo motor. Create a program that will rotate the servo motor shaft by 90 degrees (open a window to the greenhouse) when the temperature exceeds 35 degrees, and return the servo motor shaft to its original position when the temperature changes below 33 degrees.
Assemble the circuit with the DHT11 sensor and the servo motor. Create a program that will turn on the relay that controls the "heating" when the temperature changes below 10 degrees, and turn off when the temperature changes above 12 degrees. When the temperature rises above 28 degrees, a relay that turns on the "air conditioner" should be triggered and will turn off when the temperature is below 26 degrees.